Showing posts with label Exercise. Show all posts

Basement Skatepark

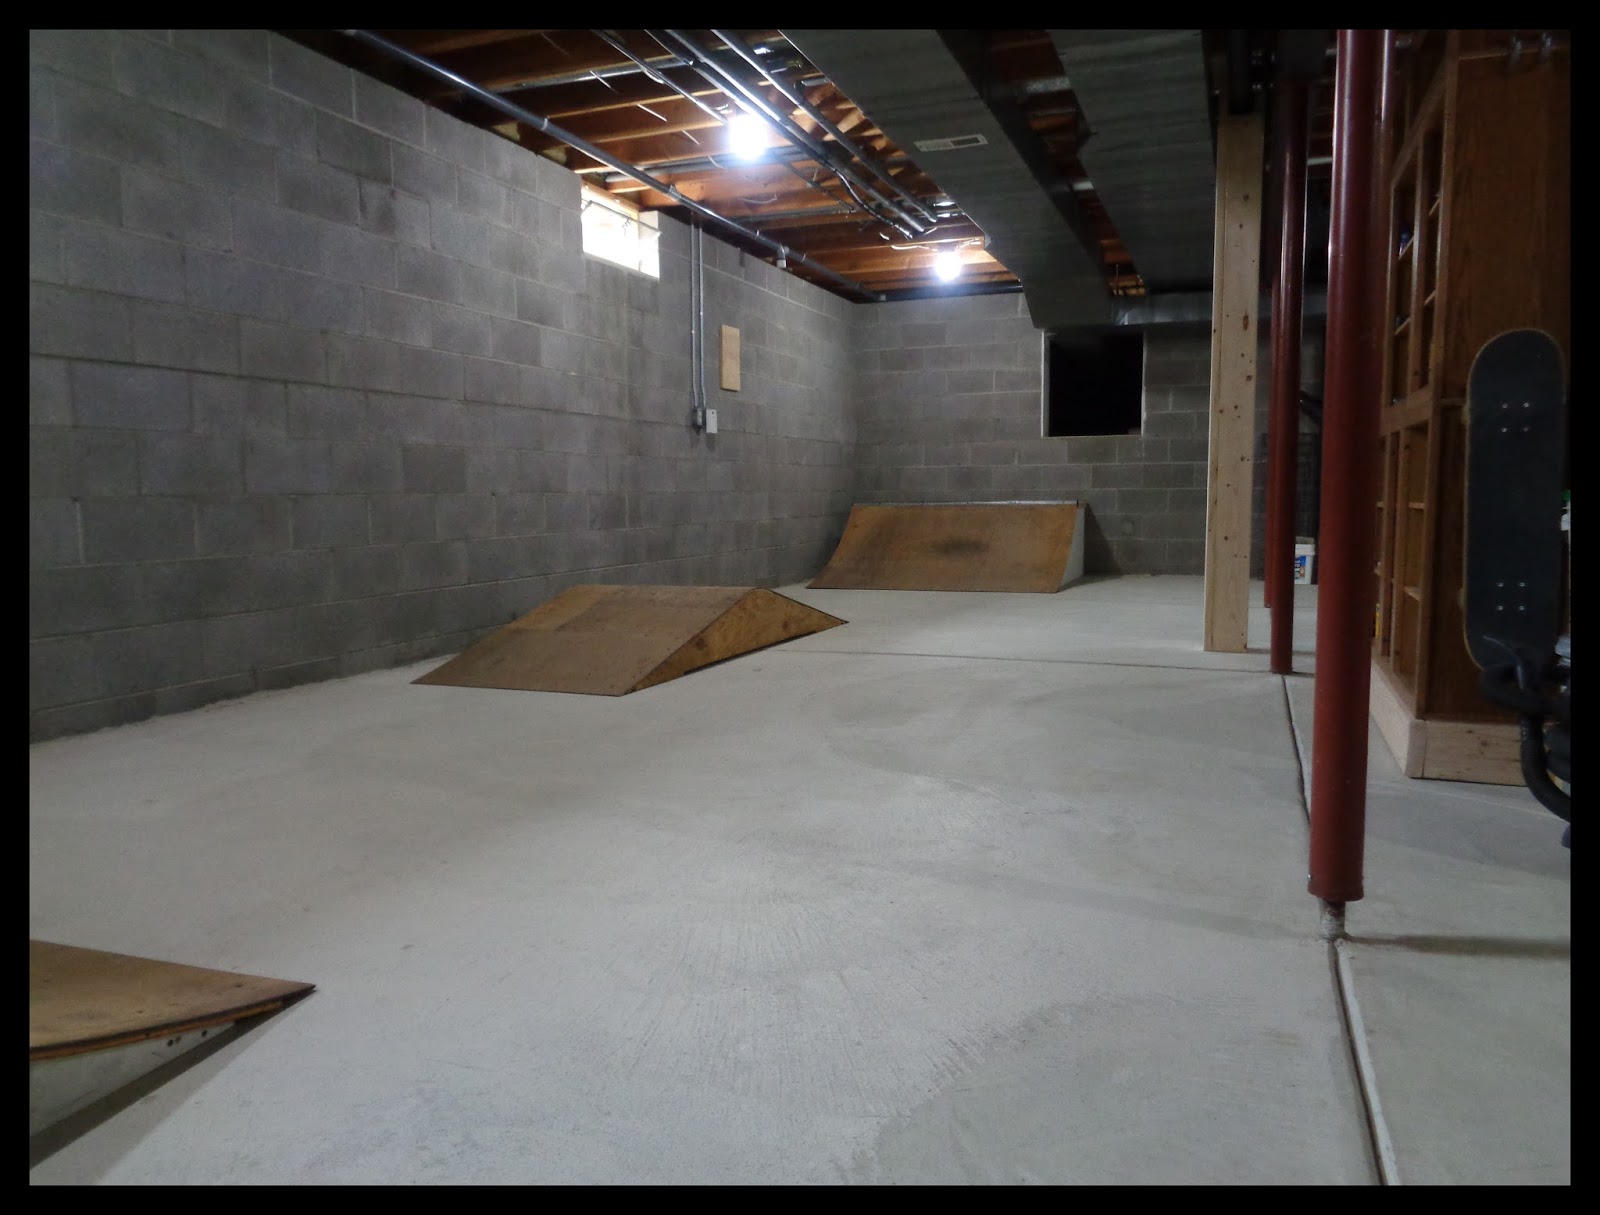
Basement Skatepark Run   There was a tough decision to be made when we moved from Montana back to Ohio. What to do with my beloved, garage mini ramp? After some half-hearted attempts at selling it, I could not bear the thought of leaving it behind. Although we did not know what sort of house we would end up with, I hoped for the best and paid for the extra space on the moving truck. Unfortunately after all the effort, our new garage just could not house the beast and even after trying to alter the geometry, it just would not work.
   Right before winter I disassembled my good friend and stored the wood in our unfinished basement. My two sons are just starting to pickup skating and I wanted to give them something that I could have only dreamed of as a teenager. A place to grow their skills and skate year-round in any type of weather. Our closest park is about twenty minutes away, forty-five round trip, which doesn't cut it on busy Dad days. So, I set to work using the materials on hand and a new course layout for the L-shaped space.
   Their stature makes smaller ramps perfect for them, I however want to skate too, so it took some deep mental negotiations to arrive at the best compromise considering the 8' ceiling height. I decided to go with 2' height for the quarters with 6' radius transitions. Still peppy enough to have fun and fly around the small park. I even consulted a professional ramp builder that suggested I could go even higher because of a skater's tucked riding position on tranny, but I did not like the idea of not being able to fully stand up on the quarter pipe decks.

Basement Wallride Ramp   After completing the two bookend ramps, I still had a large pile of leftover scraps. I built a wallride for me with a very tight 3' radius. The floor joists drop to 7' clearance in this section, so I wanted an obstacle to absorb energy while still being a fun way to route yourself back to the main park. This left me with just enough wood to finish a pump ramp for the center of the long side. I decided to mimic a heaved sidewalk with a round top, an obstacle I had wanted to build for awhile.  
   As sad as it was to toss the old transition templates, I see the beauty in the new park. The masonite, plywood, lumber, and steel coping are now a part of the fifth build using these materials. For this reason, the park shall be named "MARK V" in honor of their legacy and design evolution. The skatepark has proven to be a much better use of space than the sad pool table that was left behind, and a great way to wear the kids out on a rainy day.

Cleveland's Best Skateparks

Imagine Better Parks   Upon returning to Cleveland,, I began searching for concrete skateparks, but the online skate directories were spotty and dated at best. I now feel comfortable saying that I have experienced the extent of what Northeast Ohio has to offer, and after riding nearly twenty different skate destinations, the report for the Cleveland-Akron area is now complete.
   I will admit that I have been spoiled by Montana's Dreamland and Grindline built parks. In Northeast Ohio there are very few honorable mentions for this caliber of concrete park.

   Here's the nitty-gritty with the prefab alternatives, they have been mostly neglected and I imagine will ultimately be removed once deemed unsafe. As an adult, I see the bigger picture of bureaucracy and the lack of public will to fund the necessary maintenance for these facilities. We are now experiencing the fading boom of prefab skateparks from the early ought's, so any locals reading this, grab your Bondo, cordless drills, and get to work, you have been warned. Okay, enough of the politics behind these public parks, you want to go skate, so check the list of my top favorite local spots.
  • Avon - Oldie-but-goodie, Metal prefab on large concrete pad, Tight mini ramp with pyramid.
  • Cleveland  - Wish it was not in the Flats, Best 'crete, Too small on a busy day.
  • Hudson - Skatelite prefab on concrete, Well maintained, but nothing special.
  • Kent - Pretty small, All concrete, premature wear for a young park, Overall fun.
  • Wadsworth - All Concrete with weird layout but it resonates, Need to go back.
  • Willoughby - Another Oldie-but-goodie, Pretty much just a single, badass, metal mini ramp.
   There was some reluctance on my part to release the fail list, I did not want to be seen as a hater, I love skating and am happy to have some skate-designated concrete nearby. Any park can be fun, especially if it is your local park just down the street. However I purposely excluded the following parks because of deterioration, bad design or both: Akron, Aurora, Avon Lake, Bedford, Brainard, Brecksville, Cuyahoga Falls, Mayfield, North Olmstead, North Royalton, Stow, and Streetsboro.
   Let me be clear, my position all along has been to find a workhorse of a park, one that is well constructed with good flow, while also being a reasonable commute. Cleveland is a blessing and a curse, there are a lot of skating options within driving distance, but it also means a lot of driving just to skate. So save your self some time and start with the six listed above and visit the other thirteen if you are adventurous or like skating precarious spots with downright sketchy equipment.

Reusable Hand Warmers

   The ever oppressive 2013/2014 Winter has entered a new realm of brutality. Days have blurred into weeks of repetitive snow removal. We have seen periods of record lows along with just plain weird weeks of spring weather in the middle. This is not unusual for our Rocky Mountain town, it is however in harsh contrast to our last several mild winters.
   As I get older, my hands seem to lag behind the rest of my body when I engage in outdoor activities. Besides the unpleasant stinging of extreme cold, it is equally annoying to have to run inside every fifteen minutes to warm my hands. I stubbornly refused hand warmers for many years, but last year they finally became a necessity.
This year they proved to be well worth the bulk investment. I did have a problem with using a new pair each day for just a couple of hours. This seemed like a huge waste considering that a pair will last up to 10 hours.

Reusable Hand Warmer Trick
   Since the thermal reaction is fueled by oxygen, I wanted to see if I could stop this process by starving the heaters. Sure enough, sealing the pair of heaters in a sandwich bag achieved the desired result. The heaters cooled down and were easily revived once the bag was reopened. The important step is to push all the air out and slide the knot as close to the hand warmers as possible.
   Not only have I been able to reuse the same heaters, so far I have gotten seven uses out of one pair over a two week period. This has saved me several pairs of heaters that would have been partially used then discarded. Not to mention a single pair can cost a dollar a pack and I have been shoveling daily for the last month.

   As a final side note, this tip was inspired by my mother-in-law, who wraps wet paintbrushes in sandwich bags. I used this trick extensively throughout painting our house, saving multiple brush cleanings between recoats. Simply enough, not only does it save time and money, it reduces waste.

Schwinn DX900

   For many years, landscaping and skateboarding kept me fit, but now I am in a losing battle. I can tell that I am out of shape and this is a direct result of zero free time to exercise. I have been searching for some form of cardio to add to my limited workout time, something I could do while the boys take their afternoon nap.
Vintage Schwinn DX900   Reflecting back to my overweight youth, cycling had helped me shed the weight in the past. A stationary bike made the most sense for my situation. So with this logic, I headed out to our local thrift stores. I was feeling pretty defeated after leaving the first two stores, then we made a last minute stop at our least favorite secondhand shop. Bingo! a really nice, vintage Schwinn fixed gear bike. I laid down the twenty dollars without a second thought and dragged it to the car, literally, it is very heavy.
   I knew it needed a little love, but the ride felt really nice. I decided to set a budget of $60 dollars for new parts. The computer no longer worked and after an hour of trying to revive it, I had the epiphany to just buy a new road bike computer for $10. I was able to use the original sensor and splice it into the brain's harness. This was well worth the investment because of the motivational metrics such as speed and distance ridden.

Schwinn DX900 Redux   The stem was sloppy and I was concerned about stability when leaning forward. This got swapped out as well as the busted seat and pedals. After the parts had been ordered and the decals removed, I just could not make peace with the vintage bronze paint job. I chose to go ahead and paint the bike white, I had to remove the cranks to grease the bottom bracket anyways.
   The last touch was some craftiness from my shop. I had a set of MTB handlebar extensions that I wanted to add in order to take advantage of different riding positions. When assembled, they left a small, awkward gap in the middle. I headed to the box store with a vague idea, and came back with a 45 degree - 3/4" copper elbow that was a perfect union.
   Why would anyone spend time and money on a project like this? Well, we have a small house and aesthetically, I will have to live with this bike in my space. There is little difference in performance compared to the trendy spin cycles which are several hundred dollars to start with. I was able to breathe new life into a gym-quality bike that will now ride on for another generation.

Modular Mini Ramp

Stored Mod Ramp   While building several garage mini ramps throughout my "adult" years, I have learned some important lessons. The biggest one is nothing is permanent, including your residence. If you happened to find this post while searching ramp plans, I want you to consider taking the additional time to build your next ramp in a way that allows it to be broken down into sections. This just takes a little planning and very little additional lumber. Personally, I prefer using carriage bolts and a rail system to join the modular units.
   I am a big fan of indoor ramps for one reason, there is a roof overhead. Living in Montana, this has gotten me through many of a winter doldrums. Garage ramps are also great for a range of skill levels because they are typically restricted by ceiling height.
Mod Skate Ramp - Base Rail Detail
Base Rail Detail
   The ramp I currently own was moved out here via van lines from Ohio. If you or your kids love skating, this pricey investment could be with them for years to come. In the case that they out grow it, then it could be sold or donated to a youth facility. This ramp has also been setup at four different locations to date. The larger pieces are manageable in a standard pickup truck box, and I have even assembled it a couple times by myself.
   Currently the ramp resides in the back of my garage, while still allowing us room to park our cars in the front. The left side deck is the same height as my work bench and acts as an extension for long materials. The right side is deep enough to store a wheelbarrow and push mower during the winter. I can say at this point that it has not been a burden, it has forced me to be highly organized with the rest of the garage. I often tell curious neighbors, "I am not a golfer and it is great exercise." I do prefer skating on concrete, but once again it is an issue of permanence.

Modular Mini Ramp

Manic Maker's First Design-Build

Mini Ramp Skeleton
   It is not good to live in the past, but it is worth visiting every now and again to sort out the source of things. I recently contacted a dear old friend that I had lost contact with over the years. In my stream of consciousness, this project from my youth resurfaced, and shined with new light. It is always a trip when the universe spins a certain way and reveals itself to you at just the right time.
   This blog has been mostly retrospective, slowly weaving yarn between the various events over the last two decades. As I continue to write, the line grows taut and I see the connections a little more clearly. I now see this moment in time as a catalyst, the beginning of my future capabilities. It could be said that I took this time for granted, but I am more amazed that I never saw the significance of this work.
   This structure was the first large scale commission that I built. I did the research, drew up the plans and helped with the construction of this beast. I was aided with the help of my two closest friends and it took us several comical weeks to finish.
   Equally powerful, the forces of creation and destruction were at play. The lumber was salvaged from one friend's home recently destroyed by a tornado. The virgin plywood alone was near $2000, not cheap for three middle-class high school students. It was a project of love and that essential drive, to see it completed, reverberates through everything I have built since.
   I would also learn why large scale objects, whether ramps or exterior sculptures can be a burden. Ultimately this hallowed place met its demise at the business end of my father's chainsaw. He had been transferred out of state and the ramp was detrimental to our home's resale value.
  Ironically, I was really a lousy skater at the time and I never got to experience the sweetness of my design work. The other local skaters did though, and that made it worth while. If I had a time machine, this would certainly be my moment to relive again.


Logan County Mini Ramp - Circa 1992

All Weather Skatepark Kit

   Be prepared, once the DIY mentality takes root, it crosses over into every aspect of your life. After moving to Montana and being subject to nature's whims, I assembled an all weather skatepark kit. It contains the essentials for making a wet park rideable within minutes. The whole kit comes in under $50.00 and should last well into your old man skate years.
   The essentials include a 24" Bulldozer broom by Quickies. I like this broom because of the dense filaments and broad path. This multi-purpose tool is nice for clearing light powdery snow that is sitting on the surface. Often times there will be completely dry concrete underneath. I also pair this broom with an industrial dustpan. That has come in handy countless times. I currently drive a compact hatchback and the kit has been condensed over the last couple years. I swapped out the broom handle for a short paint roller extension handle. The 48" handle enables me to keep the whole kit in the trunk year round, ready for action.
All Weather Skatepark Kit   The next important tool is a foam rubber squeegee. This style is far superior to hard rubber models because it really bites into sealed and porous surfaces. The squeegee is for the first stage in water removal, and sometimes all that is necessary. When time is of the essence, and you are so close to riding, a pack of bath towels can really expedite the process. I was a skeptic, but I have seen the magic first hand.
    I am old school and cannot skate without music. I am not as big a fan of earbuds as the younger generation is. I found the best solution for a raging session is a Dewalt jobsite radio. The absolute best part is that it is also a battery charger that will run off of my 18 volt packs.
   Another expensive, optional item would be a gas leaf blower. The hot blown air will thaw thin ice as well as rapidly dry the surface. If I had a truck, this would be with me throughout winter skating. I will carry shovels and an ice scraper on days that require it, but these are add-ons, and only necessary for the initial spring cleanup.
   Snowboarding is still enjoyable, but given the opportunity, I will choose skateboarding any day. It is far cheaper and it is a lot more efficient use of my time. I am fortunate to have a nice concrete park nearby, and with a little work it is skateable year round. So, quit your bellyachin' and get to shovelin'.


Best Exercise Ever

   First off, I love snow. I know there are mixed feelings towards winter, but I am a huge fan. Give me snow over rain any day. The crystalline structure and the fundamental chemistry of life come together to gives us a magical experience. Who among us doesn't feel a bit of childlike glee for the first snow of the year.
   This post is not about me being a veteran snowboarder, or the beautiful alpine setting where I live. My heart swells when I awake to see heavy, wet snow covering my driveway. Yes! I love shoveling snow. I believe it is one of the best all around exercises that also accomplishes a task. There is a starting point and a finish line. Hell, it even kills people, so you know it is quality exercise. With proper form and pace, you can get a great workout and do a job that people pay others to do.

Snow Shovel Pathway
   Paying for someone to plow your drive or mow your yard never made much sense to me. Especially, when that same homeowner probably owns a gym membership. Like I said before, I enjoy landscaping, hard labor and being tired after a solid days work. The point of writing all this down is to hopefully change the attitude of at least one person out there.
   With that said. I would like to mention my favorite shovel is a Suncast SC2700. I currently own three of these shovels. This shovel is superior because it is a combo pusher and shovel. The scoop is deep enough to hold a heavy throw and make a clean pass on a two car wide driveway.
   It would only be fair to mention that I have replaced the steel wear strip on two of these shovels. I actually contacted Suncast a couple years ago to see about replacement parts, but the gave me some malarkey about not being able to match the factory rivet spacing because the parts are assembled hot.
   Whatever, you know that did not sit well with me. I made my own template and I have used it multiple times to make new wear strips. And you know what, the rivets line up every time. This is a great $3.00 solution for a $20.00 shovel. It is important to replace the strip before it breaks, which greatly weakens the plastic scoop. This mod will last much longer than the factory strip.
   These shovels are widely available for less than $10.00 in the late winter, clearance sections. I still prefer to get every bit of life out of the shovel before sending it to a landfill.


Shovel Wear Strip Repair
Sweet Modified SC2700
 
    I have  a couple other tips and tricks to reach the goal of an enviable clean driveway. Consistency is the key. I will shovel 1" of snow just to keep tire tracks from packing down the snow. A clean driveway is the easiest to shovel. A properly sealed blacktop will also aid in the snow releasing effortlessly. On days where the snow sticks to the scoop, I will spray the shovel with a thin coat of cooking spray.   So get a good shovel, develop proper technique and enjoy being outside while your neighbors are holed up waiting for spring.


Popular Posts